Wednesday, July 20, 2011

Granola Trifles Tested Recipe : Video


Granola Recipe:

3 cups (300 grams) old-fashioned rolled oats

1/2 cup (25 grams) shredded sweetened or unsweetened coconut

1 cup (100 grams) sliced almonds, pecans, walnuts, cashews, sunflower seeds, and/or pumpkin seeds

1/2 teaspoon ground cinnamon

1/4 teaspoon salt

2 tablespoons (28 grams) unsalted butter, melted or 2 tablespoons vegetable oil

1/4 cup - 1/2 cup (60 - 120 ml) pure maple syrup or honey (or to taste)

Granola Trifles:

Yogurt (Plain or Flavored)

Fresh Fruit (berries, slices of bananas, mangoes, pineapples, oranges, kiwi, apples, pears and/or melons)


A Granola Trifle layers granola with yogurt and fresh fruit. Normally, when you think of a trifle, it consists of cake, custard, and fruit which gives you a nice contrast in tastes and textures. For this breakfast trifle we have simply substituted granola for the cake, yogurt for the custard, and the fruit can be whatever is in season. I like to serve the trifle in parfait or wine glass so you can see all the wonderful layers. This recipe is adapted from one I found in Jane Rodmell's Best Summer Weekends Cookbook.

As the name implies, this trifle begins with granola, which is simply a mixture of rolled oats, nuts, and sometimes coconut that are moistened with oil (or butter) and maple syrup (or honey) and then baked until golden. While you can use a commercially made granola, this cereal is a snap to make, so I have included a recipe for making your own. I like to use old-fashioned rolled oats, not quick cooking for making granola. The difference between the two is their thickness. Old fashioned oats are thicker because to make quick-cooking rolled oats the oat groats are first cut into pieces before being steamed and flattened. Although they are often interchangeable in recipes I recommend using old-fashioned rolled oats in this recipe as I prefer their thicker texture and better flavor. Once you have the granola in hand, next comes the yogurt layer and you can use any flavor of yogurt you like. The final layer is fresh fruit, and again, you can use whatever fruit you like. While your choice will often be influenced by season, some excellent choices are bananas, mangoes, pineapples, oranges, berries, apples, pears or melons. It is best to make these trifles shortly being serving so that the granola stays crisp and crunchy. But what I often like to do is to simply let each person make their own so that they can make their trifle as large, or as small, as they like.


This trifle's roots seem to be in Scotland. It is there that I found a recipe in F. Marian McNeill's Recipes from Scotland for what is called a Scottish Cranachan or Cream-Crowdie that combines toasted rolled oats (coarse oatmeal) with whipped cream that is flavored with Scotch whiskey or rum. There is also the suggestion to add a handful or two of fresh berries for sweetness. Blueberries, raspberries, or brambles were suggested. Another similar trifle recipe was found in Orlando Murin's Dangerous Desserts for a Highland Flummery which again takes Scotch oats browned in butter and sugar and layers it with a flavored whipped cream topped with fresh berries. Both of these recipes sound delicious and since whipped cream is used instead of yogurt it would make for a delicious afternoon snack or even a hearty winter dessert. Definitely worth a try.


Granola: Preheat oven to 300 degrees F (175 degrees C) and place rack in center of oven. Either butter or line a baking sheet with parchment paper.


In a large bowl combine the rolled oats, coconut, nuts, ground cinnamon, and salt.

In a small bowl, stir together the melted butter (or oil), and maple syrup (or honey). Pour this mixture over the dry ingredients and toss together, making sure all the dry ingredients are coated with the butter mixture. Spread onto the prepared baking sheet and bake for about 25 - 30 minutes or until golden brown, stirring occasionally so the mixture browns evenly. (The browner the granola gets (without burning) the crunchier the granola will be.) Place on a wire rack to cool. You will notice that the granola may still be sticky when it is removed from the oven but it will become crisp and dry as it cools. Make sure to break up any large clumps of granola while the mixture is still warm. Once the granola has completely cooled, store in an airtight container or plastic bag in the refrigerator. It will keep for several weeks.

Makes about 4 cups of Granola.

For the Granola Trifles: For each individual trifle; place some granola in the bottom of your glass or bowl, followed by a spoonful of yogurt, then some fruit, and, if you have room, repeat the layers. Use as much or little, as you like, of each ingredient.

 
by: http://www.joyofbaking.com/breakfast/GranolaTrifles.html#ixzz1Sh3SIXxQ

Chocolate Chip Cookies Tested Recipe : Video


Chocolate Chip Cookies Recipe:

1 cup (2 sticks) (226 grams) unsalted butter, room temperature

3/4 cup (150 grams) granulated white sugar

3/4 cup (160 grams) firmly packed light brown sugar

2 large eggs

1 1/2 teaspoons pure vanilla extract

2 1/4 cups (295 grams) all-purpose flour

1 teaspoon baking soda

1/2 teaspoon salt

1 1/2 cups (270 grams) semisweet chocolate chips

1 cup (100 grams) walnuts or pecans, coarsely chopped (optional)

The Chocolate Chip Cookie is America's most famous cookie. It was invented in 1930 by Ruth Wakefield, who was the owner of the Toll House Inn in Massachusetts. The story goes that one day she decided to add small chunks of a Nestle's Semisweet Yellow Label Chocolate bar to her butter cookie dough. These 'chocolate chip' cookies were an instant hit with her customers and word of their popularity reached the Nestle company. Nestle must have realized that adding small chunks of their chocolate bar to cookie dough would appeal to the mass market because by 1939 Nestle had already developed, and was selling, small chocolate morsels (or chips) in a yellow bag. Nestle then went on to buy the rights to the Toll House name and to Ruth Wakefield's 'chocolate chip' cookie recipe. They called her recipe "The Famous Toll House Cookie" and printed it on the back of the Yellow bag of chocolate chips.

This Chocolate Chip Cookie recipe is very similar to the recipe on the back of the bag of Nestle's Chocolate Chips and my kids never seem to tire of them. Made with unsalted butter and a combination of white and brown sugars, it produces a rich and chewy cookie with caramelized edges. Although flour, sugar (white and/or brown), butter or margarine, baking powder and/or baking soda, eggs, vanilla, and chocolate chips make up a chocolate chip cookie recipe, taste and texture do vary by recipe. So if you want to try another type of chocolate chip cookie I have included a recipe for Chocolate Chunk Cookies.

Chocolate Chip Cookies: Preheat oven to 375 degrees F (190 degrees C) with rack in center of oven. Line two baking sheets with parchment paper.

In the bowl of your electric mixer (or with a hand mixer), beat the butter until smooth and creamy. Add the white and brown sugars and beat until fluffy (about 2 minutes). Beat in eggs, one at a time, making sure to beat well after each addition. Add the vanilla and beat until incorporated. Scrape down the sides of the bowl as needed.

In a separate bowl, combine flour, baking soda, and salt. Add the dry ingredients to the egg mixture and beat until incorporated, adding the chocolate chips and nuts (if using) about half way through mixing. If you find the dough very soft, cover and refrigerate until firm (from 30 minutes to two hours).

For large cookies, use about a 2 tablespoon ice cream scoop or with two spoons, drop about 2 tablespoons of dough (35 grams) onto the prepared baking sheets. Bake about 10 - 14 minutes , or until golden brown around the edges. Cool completely on wire rack.

Makes about 4 dozen - 3 inch round cookies.

Note: You can freeze this dough. Form the dough into balls and place on a parchment lined baking sheet. Freeze and then place the balls of dough in a plastic bag, seal, and freeze. When baking, simply place the frozen balls of dough on a baking sheet and bake as directed - may have to increase baking time a few minutes.


by: http://www.joyofbaking.com/ChocolateChipCookies.html#ixzz1Sgxoqy00

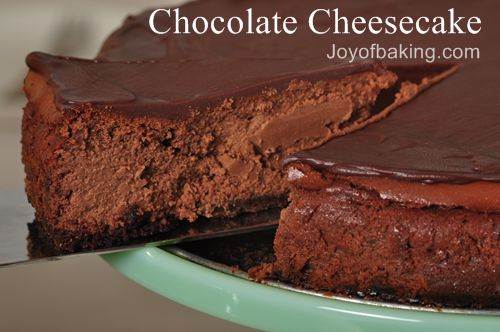
Chocolate Cheesecake Tested Recipe


Chocolate Cheesecake Crust:

1 1/2 cups (150 grams) chocolate wafer crumbs

1/3 cup (75 grams) unsalted butter, melted

Filling:

12 ounces (340 grams) semi-sweet or bittersweet chocolate, chopped

24 ounces (680 grams) (3 - 8 ounces packages) full fat cream cheese, room temperature

1 cup (200 grams) granulated white sugar

3 large eggs, room temperature

1 1/2 teaspoons pure vanilla extract

1 cup (240 ml) full fat or light sour cream, room temperature

Ganache:

4 ounces (115 grams) semi-sweet or bittersweet chocolate, chopped

1/3 cup (80 ml) heavy whipping cream

1 teaspoon unsalted butter, room temperature


A Chocolate Cheesecake is a real showstopper with its three layers of chocolate. The first layer is a sandy textured chocolate crust made with crushed chocolate wafers mixed with a little melted butter. The middle layer is the main attraction. A chocolate cheesecake made with a knock-out combination of chocolate, cream cheese, sugar, eggs, and sour cream. It is sinfully chocolately yet with a delightfully tangy flavor that has a texture that will remind you of a thick, silky smooth chocolate mousse. Once baked, cooled, and chilled, the final chocolate layer is added. It is a mixture of cream and chocolate (really a ganache) that makes you think you are eating a chocolate truffle.

For let's get started on this Chocolate Cheesecake. For the chocolate crust all you need to do is process the chocolate wafers in your food processor and then add some melted butter to bind the crumbs together. You can use either homemade chocolate wafers (recipe here) or you can use a commercial brand. Next, the chocolate cheesecake layer, which is simply a matter of beating together room temperature cream cheese, sugar, melted chocolate, eggs, vanilla, and sour cream. The recipe was tested using full fat cream cheese and full fat sour cream.

 Now, the type and brand of chocolate you use for both the cheesecake layer and top layer of ganache will determine the taste of both layers. So make sure you use a good quality chocolate that you enjoy eating out of hand. When choosing a chocolate, always look for one that has a lovely shiny finish (a sign that the chocolate was cooked at the right temperature for the right amount of time) and one that has that wonderful 'snap' when you break it into pieces. Bittersweet and semi-sweet chocolates contain at least 35% chocolate liquor in North America. The best chocolates can contain upwards of 50% chocolate liquor. The higher the content of chocolate liquor, the more rich and flavorful the chocolate. Keep in mind that bittersweet chocolate generally has a stronger, more bitter chocolate flavor than semi-sweet chocolate. That is because semi-sweet chocolate contains more sugar, however, because the amount of sugar is not regulated, what one manufacturer calls bittersweet may be called semi-sweet by another manufacturer. That is why tasting the chocolate is so important. Some popular brands I like are Callebaut, Guittard, Ghirardelli, Lindt, and Scharffen Berger.

Finally, although I have talked about the pitfalls of making a cheesecake before, I think it bears repeating. There seems to be two main problems with making cheesecakes, cracking and determining when to pull the cheesecake from the oven. First, let's talk about cracks on the surface of a baked cheesecake, as this is a common problem that is caused either by over beating the batter and/or by too much moisture being lost as the cheesecake bakes (over baking). In order to prevent cracks make sure to beat the ingredients at low speed because we do not want to incorporate a lot of air into the batter. All we want to do is to beat the ingredients until they are nice and smooth. As far as over baking of cheesecakes, this is a common problem made especially hard with a chocolate cheesecake. Use the baking time as a guide only as ovens do tend to vary. The thing to remember is that you want the cheesecake to be firm but, if you shake the pan gently, it should still wobble a little, and the center will still look a little wet. For even though the center may not look fully baked, once it cools it will firm up and be the correct consistency. Cheesecakes are cakes that should not to be eaten straight away as they need to cool and then be refrigerated for several hours, preferably overnight, so the flavors have time to blend and the texture becomes nice and firm.

Cheesecakes store very well and can be frozen. To freeze, place the cooled cheesecake on a baking pan and freeze, uncovered, until firm. Remove the cheesecake from the freezer, wrap it in heavy duty aluminum foil and place in a freezer bag. Seal and return to freezer. It can be frozen for several months. Thaw the uncovered cheesecake in the refrigerator overnight. The best way I have found to cut a cheesecake is to use a long knife that has been warmed in hot water. To do this, dip your knife in hot water, wipe the knife dry, and then cut the cheesecake. To cut another slice, again dip the knife in hot water, dry, and cut.

Chocolate Cheesecake: Butter or spray with a non stick vegetable spray, a 10 inch (25 cm) spring form pan. Preheat oven to 350 degrees F (180 degrees C) with rack in center of oven.

Crust: In a medium sized bowl combine the chocolate wafer crumbs and melted butter. Press the crumbs evenly over the bottom of the spring form pan. Cover and refrigerate while you make the filling.

For Filling: Melt the chopped chocolate in a stainless steel bowl placed over a saucepan of simmering water, stirring until smooth. Remove from heat and set aside to cool.

Meanwhile, in the bowl of your electric mixer (or with a hand mixer) beat the cream cheese, on medium low speed, until smooth. Gradually beat in the sugar. Add the melted chocolate and beat until fully incorporated. Add the eggs, one at a time, beating well (about 30 seconds) after each addition. Scrape down the sides of the bowl as needed. Add the vanilla extract and sour cream and beat until thoroughly incorporated. Remove the crust from the refrigerator and pour in the filling. Place the cheesecake pan on a larger baking pan and place in the oven.

Bake for about 50 - 55 minutes or until firm yet the center of the cheesecake will still look a little wet and wobbly. Remove from oven and carefully run a knife or spatula around the inside edge of pan to loosen the cheesecake (helps prevent the surface from cracking as it cools). Let cool and then cover with plastic wrap and refrigerate for a few hours before covering with the ganache.

Ganache: Place the chopped chocolate in a stainless steel bowl. Heat the cream and butter in a small saucepan over medium heat. Bring just to a boil. Immediately pour the boiling cream over the chocolate and allow to stand for a few minutes. Stir until smooth. Cool slightly and then pour over cheesecake. With an offset spatula or back of a spoon, evenly spread the ganache over the top of the cheesecake. Cover and return to the refrigerator for several hours or overnight. This cheesecake tastes best after being refrigerated for at least a day. Serve in small slices.

Serves at 12 - 16 people.


To freeze: Place the cooled cheesecake on a baking pan and freeze, uncovered, until firm. Remove the cheesecake from the freezer, wrap it in heavy duty aluminum foil and place in a freezer bag. Seal and return to freezer. Can be frozen for several months. Thaw uncovered cheesecake in the refrigerator overnight.

Adapted from:
Stern, Bonnie. Desserts. Random House of Canada Limited. Toronto: 1988.

by: http://www.joyofbaking.com/ChocolateCheesecake.html#ixzz1Sgs1NAgY


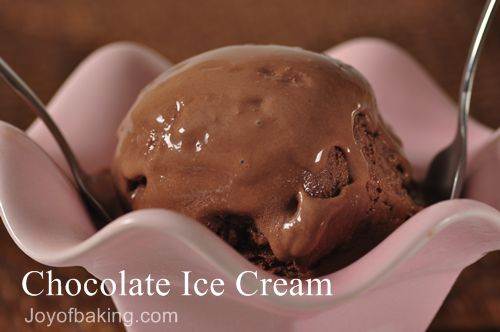
Chocolate Ice Cream Tested Recipe


If you are a chocolate lover, you will not be surprised to hear that chocolate ice cream is an American favorite. This chocolate ice cream has a deep and rich chocolate flavor because it contains both cocoa powder and semisweet chocolate. Its silky smooth texture comes from making the ice cream with a custard base. Lovely on its own or served with vanilla or even strawberry ice cream.

Ice creams that start with a custard are made from cream, sugar, eggs, and vanilla. Each ingredient contributes to the ice cream's smooth texture and rich flavor. The amount of cream used and its butterfat content gives ice cream its rich and creamy taste. The next ingredient, sugar, gives the ice cream its smoothness. The eggs are necessary for smoothness and also gives the ice cream its nice color. The best results come when the custard is made the the night before and left in the refrigerator overnight to chill sufficiently before it is churned. It is important that the custard only fills your ice cream machine about half to two thirds full. This gives the custard enough room to expand while it freezes so you end up with an ice cream with a light texture and no graininess. As the ice cream is still quite soft once it has been churned in the machine, transfer it to a storage container and place it in the freezer for a few hours before serving. This also allows the flavors to mellow. Although I prefer to eat homemade ice cream the day it is made, it can be stored for a few weeks in the freezer. It will become quite hard after being frozen for any length of time so transfer it to the refrigerator to soften for about 30 minutes before serving.

As this recipe only uses egg yolks, there is always the question of what to do with the leftover egg whites. Meringues (Meringue Cookies, Meringue Hearts, Meringue Mushrooms, Pavlova) are always a good way to use egg whites as is the Chocolate Angel Food Cake.


Chocolate Ice Cream Recipe:

2 cups (480 ml) half-and-half

1/3 cup plus 2 tablespoons (50 grams) unsweetened cocoa powder

1/2 vanilla bean or 1 1/2 teaspoons pure vanilla extract

2 ounces (55 grams) semisweet chocolate, chopped

4 large (80 grams) egg yolks

1/2 cup (100 grams) granulated white sugar

Note: Half and Half cream is a mixture of cream and whole milk and contains 10 - 12% butterfat.


Chocolate Ice Cream: In a small saucepan gradually whisk together the half and half and the cocoa powder until it is a smooth paste. Place over medium-high heat and bring the half-and-half cocoa mixture and the vanilla bean (if using) to the scalding point (the milk begins to foam up). Remove from heat, take out the vanilla bean and scrape the seeds from the bean with the back of a knife, and mix the seeds back into the half-and-half. Add the chopped chocolate and stir until the chocolate has completely melted and is smooth.

Meanwhile in a stainless steel bowl beat the egg yolks and sugar until light and fluffy (about two minutes). You can do this with a wire whisk or I like to use a hand mixer. Gradually pour the scalding half-and-half mixture into the whipped egg yolk mixture, making sure you keep whisking constantly so the eggs don't curdle. If any lumps do form, strain the mixture first before heating.

Place the bowl over a saucepan of simmering water and, stirring constantly with a wooden spoon, cook until the custard thickens enough that it coats the back of a spoon (170 degrees F) (77 degrees C). (The term 'coat a spoon' is a technique used mainly as a way to test when an egg-based custard or sauce is done. A spoon, usually wooden, is placed in the custard and, when the spoon is raised, the film of custard on the back of the spoon will stay in place even when you draw a line with your finger through the middle of the custard.)

Immediately remove the custard from the heat and continue to stir the custard for a few minutes so it does not overcook. At this point stir in the vanilla extract, if using. Cover and let cool to room temperature and then refrigerate the custard until it is completely cold (several hours but preferably overnight).

Transfer the cold custard to the container of your ice cream machine and process according to the manufacturer's instructions. Once made, transfer the ice cream to a chilled container and store in the freezer. If the ice cream becomes too hard place in the refrigerator to soften for about 30 minutes.

Preparation time 1 hour.


by: http://www.joyofbaking.com/ChocolateIceCream.html#ixzz1Sgp1KdZ8


Sunday, July 17, 2011

The Hottest Short Hairstyles For Women In 2011


Whether you are into short hair styles or long, it is every girls dream to be a summer diva dressed in the latest fashion trends. However, no fashion trend is truly stylish without the cutest hairstyle ever to bring out your natural beauty and personality. This summer it seems that every fashion forward girl is going short and sassy with the hottest short hairstyles for women in 2011. We have three words of fashion advice for you this year: layers, bobs, and pixies.

The Layers

Layered hairstyles look good on ladies of all ages with any face shape. These styles work great with any hair length, add volume to thin hair, and are easy to manage, taking hardly any time at all to style and be out the door.

When layers are added to the top and sides of a short hairstyle, they add texture and become one of the trendiest short hairstyles being worn by women all over the world at this time.

The Pixie Cut

Mia Farrow popularized the pixie do in the 60s. This summer, pixie styles have been popping up everywhere in Hollywood on the most well known singers and actresses. A few examples of celebrities include Emma Watson, Michelle Williams, Ginnifer Goodwin, Carey Mulligan, Halle Berry and most recently Kate Winslet.

Alexa Chung is known for her messy pixie cut which has got to be the cutest and carefree pixie of all in my opinion. But then again, everything about Alexa is pretty much carefree. The lady is just naturally beautiful and possesses a very sleek look at all times without much effort.

Pixies work best with thick, wavy hair, but straight hair works as well. This style looks the best on heart, oval, and square faces. However, if you have a round facial shape, you might want to avoid this type of cut.

The Bob Cut

The bob is back and has girls raving, but for the 2011 trendiest hairstyle it is worn slightly longer instead of rounded and with the fringed bangs. The whole look is more retro-inspired than before and sets off a softer look.

One of the most popular bob hair styles is The Posh. Victoria Beckham is credited for popularizing this trendy hairstyle and many ladies around the world are copying her with short to medium bob hairstyles. Ask any hairstylist what the most requested hairstyle is in 2011 and she will tell you, the posh. So grab those rat tail combs ladies, it is time to do, "The Posh".

So now that you have been given the scoop on all the hottest short hairstyles for women in 2011, I hope that this little bit of information has helped you with choosing a brand new trendy style to fit your personality perfectly. After you have searched online and in magazines for pictures of what you like, it is time to head over to your hairstylist to get your summer diva thing going on with the trendiest short hairstyle for you. I will see you there ladies, in my POSH!

By Sherry Brister


FOUR Easy Tips to Whiten Your Skin


Before you read the following content, you can take a look in the mirror. Maybe you will find that your current skin color is a little darker than the spring time. As the temperature is higher and higher gradually, what we wear exposure our skin more and more. Lots of girls are worried about the problem of skin color. They want to know the methods or tips to whiten the skin color even in the hot summer. As a girl who is also interested in this topic, I'd like to share some personal experiences with you.

1. Applying sunscreen

Well I have to say that applying sunscreen is really significant. Sunscreen can protect your skin from the sunburn. Perhaps some people will think that sunscreen just has the function of protection, but can't whiten the skin directly. Let's just imagine if you didn't apply sunscreen for the whole summer, at the end of the summer you are definitely darker than in the beginning. By this simple comparison, some of you will understand the importance of applying sunscreen.

2. Drinking plenty of water

Some people will doubt is there any relationship between drinking water and whiten the skin. Well we all know that water is so important to our body and skin. Water balance is the basic element for maintaining beautiful skin. If your body can't get enough water or always in a state of hydropenia, your skin will become dry and the secretion of sebaceous gland will reduce. So your skin will lose elasticity, even wrinkles will be caused due to hydropenia. Thus when you want to whiten your skin, the basic work of skin care should be done well too. And drink plenty of water is the basis for skin care.

3. Making use of lemon

We all know that lemon is rich in vitamin C. And vitamin C can promote metabolism,postpone aging, whiten your facial speckle and shrink the pores. According to the research, lemon can reduce the incidence of skin cancer. In other words, lemon is very important to keep our skin healthy and white. The easiest method is adding several slices of lemon in your drinking water and persists for a period of time. Then you will surprise to see the effect. You also can put the fresh lemon slices on your face to enjoy a comfortable and whitening mask. And you are suggested to have such mask in the evening as the effect will be better than in the day time.

4. Eating fish

Scientific studies found that eating fish three times a week can protect skin from ultraviolet's attack.Long-term fish-eating can provide people with a natural protection similar to the sunscreen and whiten your skin.

A large part of girls want to be whiter. And as long as we adopt the correct methods, it will not so hard to whiten the skin.

By Emma Clark


Saturday, July 16, 2011

Looking for Really Cute Baby Shower Gift Ideas


A baby shower can be a relaxing time for families and friends to get together and celebrate the impending birth of a new baby. While at times the planning of a shower can be stressful, with careful planning and plenty of assistance, everything should turn out smoothly.

One fun aspect of a baby showers is the opening of the gifts. There are a number of gifts that can be given that are centered towards the mother more than the baby. This is perfectly natural and accepted because the mother will definitely need some pampering and some help when it comes to the big day. Your baby shower gifts can be reflective of the moment at hand or simply a practical item that will be in great need, such as diapers or bottles.

Personalized gifts for girls are societally geared in the color pink. This is not a requirement so much anymore as gender roles are being blurred. It is best to get the plans from the mother as to what colors she wants to have for the baby. These personalized gifts for girls can range from lighter colored stuffed animals and female cartoon character based designs. Other personalized gifts for girls can even come in the form of a hand made quilt with the baby's name on it.

Personalized gifts for boys are similar in that they are no longer limited to being just blue. It is not entirely gearing towards "masculine" occupations or sports either. This is also generally a choice of the mother (or father) so you should take into account the design of the nursery. Hand crafted items are going to be more appreciated compared to store bought items. Personalized gifts for boys are going to be quite similar in that you could make up a quilt with the boy's name stitched on it.

Gender neutral gifts are the exception since so many parents are choosing to know the gender of their baby before it is born. Color is not as big of an issue with a gender neutral gift. Greens, whites and browns tend to be good choices as they convey a sense of security to anyone who sees the baby's room to dote on your new baby after he or she is born.

Whatever you decide to gift to the family, whether its geared toward the mother or baby, as long as it's given with love, she'll appreciate your effort.
By LaTusha Edwards


Five Fun Finger Foods for a Kid's Party


When it's party time, kids don't have time to sit calmly and eat a plate of food. You can serve them something nutritious, delicious, creative, and amusing. Use small bites that little hands can walk away with. Things that won't stain carpet or clothing. Kids want their food mobile, quick, on the go...something to get them back to the party games and their friends.

Here are 5 fun finger foods for a kid's party or family event.

1. Mac 'n Cheese quesadillas - mix up a batch of good old Kraft Macaroni and Cheese dinner and layer it into tortillas. Fold over and bake in oven for ten minutes at 350 degrees. Cut into small triangles or wedges and serve to your guest brood. They'll be begging for more of these.

2. Mini pizzas - get mini bagels from the store (or English muffins) and spoon jarred spaghetti sauce over the surface. Cover amply with shredded cheese and bake in the oven until the cheese is bubbling. Kids love pizza more than television, it seems, so they'll be grabbing these throughout the party. Don't both putting too much else on the pizzas as kids don't always go for the vegetables or the pepperoni. Keep it simple.

3. Chicken nugget bites - kids adore chicken nuggets and will come back over and over for more. Serve with a side of ketchup (their universal sauce), barbecue sauce, or really mix things up and place a bowl of Ranch dressing. Have toothpicks available for dipping.

4. Sliders or mini hamburgers - these are great for any occasion to keep little hands full, but they're especially good for parties because they're filling and can get kids involved in dressing the bun. Grill up small patties and top with cheese and ketchup. Toss one pickle on top before closing up with the bun. Serve a bowl of hearty potato chips on the side and you'll see smiles for miles.

5. Pigs in a blanket - a traditional favorite of kids is a mini hot dog inside a biscuit wrap. Purchase Lil' Smokies sausages at the store as well as canned biscuit dough. Half each individual biscuit and roll a sausage into the center, completely wrapping the dough around it. Bake in the oven according to the directions on the biscuit packaging. They'll be very hot after cooking, so make sure they cool properly before serving to your younger guests.

These recipes are great for a kid's party, or even your next family reunion, a holiday party, or a baby shower.

By Criss White


Makeup Beauty Tips To Reduce The Signs Of Aging


Aging is a natural process which can often appear cruel. Especially if you have been the proud owner of fresh skin all round the year, and a complexion that goes with every shade of color you wear. So if you are finding it hard to accept the change in your facial skin due to advancing age, then here is a way out. The wonders of make up are many. So if you feel your skin is failing to brighten up your face, you can undo the same through make up.

Did you know that you can make your face take an entirely different shape with expert make up? And you could even hide those wrinkles on the ends of your face without making an overstatement with your blush-on. Well here is the basic approach that would be ideal for your face.

1. On an average the blood replenishes the skin without moisture in a systematic manner. With age the blood flow reduces and the frequency with which your skin is replenished reduces. This leads to drying and formation of wrinkles. If you want to hide and reduce the wrinkles on your face, then you need to use a hydrating mask more frequently. Therefore, ideally you need to take a mask or face pack half an hour before you start the make-up. This will leave your skin well rejuvenated and more ready.

2. When you select the foundation, you will find the original shade appearing to be a mismatch on your skin. This is due to the fact that your original complexion has undergone a change with age. Experts always advice to use foundation two shades darker than your original skin color. This highlights the features of your face and must be used as the base. Wherever there is a necessity to correct an odd nose or a high jaw, use a second foundation that is two shades lighter than the base to bring the change. With correct application, you can actually make your face look picture perfect without looking overdone.

3. Apply light mascara and blush ons, and emphasize your lips with a darker lip liner. These actually take the attention away from your wrinkles and highlight the beauty of the eyes and lips. In any case, do not go for loud shades. Often you can make your eye shadow fill up for a loud blush on. This reduces the stark contrast that a deep blush on would provide while allowing the color to exist in a light manner.

Ultimately, it bogs down to how regular you are with your beauty care regime. Keeping your skin healthy essentially means you regularly cleanse and tone your skin. This way you can keep your face looking fresh. Moisturizing and fruit packs are sure way to reducing the signs of aging. Use these makeup beauty tips to bring the desired look back to your beautiful face, and glow again!

By Kathleen Chester


Important Considerations When Buying Your Fish Tank Filter


Fish tank filters are probably one of the most important equipment in an aquarium unit but it is also one where little consideration is initially given. It is this piece of equipment that maintains the delicate balance of water purification in the aquarium allowing for an environment that is able to sustain your aquatic life.

The aquarium is an enclosed ecosystem unlike the lakes and sea that the fish originated from. In nature, the size of the body of water plus the natural environment allows for a balance of chemical concentration and pH levels that make it ideal for fish to live and breed. But in the aquarium, the amount of water is small and it is only the filter that aids in removing waste matter and balancing acidic levels to livable conditions.

When buying a fish tank filter, there are a number of considerations which you do need to take into account before actually making the purchase. They include the cost of the filter, the amount of maintenance you are able to do and the type of aquatic life that you are planning to breed.

Cost is definitely a big consideration. There are so many fish tank filters to choose from and their prices can range from mere dollars to hundreds. Canister fish tank filters are notably the most expensive and for the price that you pay, they do provide excellent filtration. The same goes for diatom fish tank filters. These expensive filters also require very little maintenance and allow you to go for long periods of time without having to do a water change. The cheaper filters such as corner filters or sponge filters will require a lot more maintenance and cleaning and do not provide as efficient filtration as their more expensive counterparts.

The amount of maintenance you are willing to do for your aquarium will play a big part in the type of aquarium filter that you buy. If you are a busy person with very little time on your hands, you will need to opt for filters that require little maintenance. These include canister filters and diatom filters. But these filters do come with a high price. However, if you are not willing to spend that much on your aquarium, bear in mind that you will need to do frequent cleaning. For undergravel filters, this involves vacuuming the gravel. for sponge filters, it would mean washing the sponge and for corner filters, you would have to remove the filter media from the box and washing it. Not doing this will cause the filter to be clogged and might even back the waste up not the aquarium water.

The type of aquatic life you plan to breed in your tank is the final consideration. The main concern here is the strength of the filter suction. If the suction is too strong, weaker aquatic life might get sucked in or stuck at the suction inlet. This will definitely kill your fish. Canister, diatom and power filters tend to have too strong suction but the more expensive models might allow you to regulate this. It is also a good idea here to place a small cage like attachment or a sponge head over the inlet to so that suction will not be focus on a small area. Undergravel and sponge filters are ideal for weaker fish. They do not suck in the fish no matter how strong the suction may be.
By Timothy Kessler


Five Essential Dog Clothes and Accessories


Dog clothes and accessories are serious business these days. So today I am going to review a few essential items that you may have overlooked ....

1 - Dog Beds

Every dog needs a bed, especially for older canines like ours. As our house is tiled, and the floor gets very cold. There are a few things to look for in dog beds. Our dogs bed is very sturdy. If your pooch is one that likes to have a bit of a gnaw on her slumber place, then spending extra on a hardy one will save you lots of money in the long run. Another thing is the pillow part on the bottom. Some dogs are terrible wrigglers, constantly moving around in the bed trying to get comfortable, and often the bedding comes out. The bed we have at the moment has two clips on the bottom that keeps it in place! So we don't have to keep putting it back.

2 - Harnesses

Harnesses are necessary for travelling in cars. They restrain your dog properly, so that they don't get hurt in an accident, or get in your way while driving, ( not a good idea!! ) our dog finds it hard to resist climbing into an empty lap, so that's handy for me! She has a very chic purple one that matches her collar. Harnesses are also good for walking, if you are a dog that pulls, or a sneaky dog like ours - that has worked out how to use the leash to pull out of her collar! Harnesses are much better for dog's that pull, rather than choker chains. Choker or "Check" chains are very bad for dog's necks, and can damage their throats. Harnesses work much better because they apply pressure to the dog's whole body rather than their necks.

3 - Collars

Collars are very important, for identification as well as restraint. All dogs should have a collar, and all your pooches need identification tags on them, with your phone number and your name, in case they decide to go walkabout and get lost! It's all good and well to have a microchip, but not everyone has a scanner for it, do they? Collars are also a basic dog fashion accessory.

4 - Leashes

Leash sizes and length are an important factor. If you have a big strong canine or a medium size dog like ours, your will have a much better time controlling her with a short leash - especially if you need to cross the road. For a small dog a longer leash is probably better, since they are not strong enough to pull away anyway... But I do know how feisty your little pooches get - definitely big dogs trapped in small bodies! Also, as with the collars, leashes can be very fashionable dog clothes and accessories.

5 - Collapsible Water Bowls

Of course everyone needs water - especially when we take our dogs for walks, and they get all hot and thirsty. Dogs can get heat stroke very quickly, you know! If it's hot make sure you checks their paws. If they are hot your dog may have heat stroke. Of course you can just give them a drink from a tap, but what if you can't find one? Better safe than sorry, especially when it concerns their health. Or maybe you have a dog like ours who refuses to drink from taps. She hates it when water gets up her nose, and refuses to drink from a tap.

That is it for today, remember dog clothes and accessories play a vital part in any healthy, happy dog's life.

By Jay Mac Bheathain


Learning To Cope With Seizures In Dogs


Seizures in dogs can be a concerning occurrence for the owner or carer. Finding out about what they are and the different types can help you to understand why they are happening and what to look for before another one occurs. You should learn what you can do and what you shouldn't do if you witness one. There are things which you could do to help your pet through their recovery and a diagnosis and treatment plan can be discussed with your vet.

These episodes are due to a malfunction in the brain, this might be seen as a sudden burst of activity or other unusual activity. This will result in a loss or reduced consciousness and this may be quite disturbing for those who witness it, particularly for the first time. The length of time can vary and in most cases will be no more than a few seconds, if it lasts for more than five minutes you should contact your vet. In some severe incidents the seizure can last for up to an hour.

What may appear as an amusing leg twitch or an unusual mouth movement that the animals appears to have no control over may be a focal seizure. The more obvious and well known type of occurrence is the full body stiffness with some involuntary movement of part of the body, and perhaps uncontrolled barking or whining. These are called Generalized seizures.

It is sometimes possible to see when a seizure is going to occur with the presence of unusual behavior. Your pet may appear worried or frightened by an apparently imagined reason. Once the incident is over you may find that your animal has still not returned to its usual self and there may still be some behavior which seems out of place, they might appear lost and confused.

Remember to keep calm so that you can help your pet, move any dangerous objects which they might crash into if they move. Take care not to touch or try to comfort the animal as this could result in you being hurt involuntarily by the dog. As any responsible animal owner would do you will more than likely need to ring the vet who can advise you on possible causes and treatments.

When your animal comes back around and is responsive they may still appear somewhat out of sorts. Try not to crowd the animal or swoop them up into a reassuring hug, keep calm and talk gently to them. This may help them to re-orientate themselves to their surroundings. They might appear tired or unsure of what to do and they might have urinated during the seizure. Keep an eye on them and make a note of what happened and how long the incident lasted so that your vet can have all the details.

Medication could be the solution to a diagnosis that indicates a repeat of the occurrence, although it can take time to find the medication best for your dog our vet will help you to make the right choices. Other reasons for fits might be tumors which might be removable, sun stroke or injury. Both which might be short term illness and may be controllable by simply changing the environment or dealing with the cause.

Whether it is the first time you have witnessed a seizure or the tenth time you might see that there are differences and what you should look for in an attempt to predict their occurrence. You will learn how to behave both during and after in a way that is most suitable for your pet and your vet can advise you on suitable long term care plans.
By Celine Europa


Keeping Your Cat From Damaging Furniture


Those of us with cats know all too well that one of their defining physical features is the inclusion of little razors at the end of their hands, useful for defending themselves against predators but mostly for destroying items around your house. Thankfully, there's a lot you can do to prevent the damage as much as possible. Here are just a few solutions.

There are three main reasons a cat will scratch at furniture. The first is to sharpen their claws, which they feel they need to maintain despite living a posh life indoors where their only predators are the vacuum cleaner and rocking chairs. The second reason is to stretch their muscles as the act of scratching is actually a full-body activity. The last reason is that it just feels good, so they like doing it.

When it comes to stopping cats from clawing things, it's best to start mild and work your way up to more drastic measures. Start small by simply spraying the cat with water every time it begins scratching. And yes, this does work on at least some cats. The tricky part is always catching the feline in the act. You can't punish them after the fact as they won't readily connect the two together, so they have to be sprayed while their paws are touching the fabric and the claws are popping.

If this isn't working, or if you just can't be around at all times, then consider covering the scratching corners with something to dissuade them from putting their paws on them, like double-sided tape, bitter spray, or even tin foil. The downside is that for a while you'll have to endure something silly on your furniture when the point of all of this is to lessen the damage. Still, if this works you'll be very happy with the results.

The final option is the most severe, and it involves having your cat declawed. This should only be considered in the most extreme cases as it's not a procedure that's really encouraged since it involves cutting the end of each cat's fingers off. This can cause discomfort in walking and standing, and sometimes just drastically affect your kitty's overall personality. A better solution would be to simply clip their nails on a regular basis or to attach plastic nail caps to their claws.

It seems that whatever we try and decide, cats are going to decide something different. They can be taught, but it takes a while. Find a method that you're comfortable with and good luck!

By Robert Walden


Welcome to the World of Affection Via Tonkinese Cats

 
'The words cat and cute are not only similar to hear, but are quite similar literally as well,' said a former TV presenter. Like dogs, cats also have a special place in the drama called life. Cats, like happiness come in different shapes, sizes and colors. One such colorful breed is the Tonkinese cat.

Like the Canadian hairless cat, the Tonkinese cats have originated from the lands of Canada. This is a medium sized cat breed, a cross between 2 beautiful cat breeds - the Siamese cat breed and the Burmese cat breed.

History of Tonkinese Cats

'History is a half right- half wrong fable agreed upon.' Same way, there are some instances which connect this recent breed to historical era of the 19th century. Some people believe that these cats often trace their roots back to the 'Wong Mau' miracle cat (a small sized walnut colored cat, courtesy - Dr. Joseph Cheesman Thompson, 1930). Most other journals and experts put the start of breeding as late 19th century, which is widely accepted. All in all, the exact history is debated but these cats aren't as old as some other species.

Name Game

This pet breed was earlier called as - Tonkanese which got later modified to Tonkinese. Origin of its name is the namesake island in the musical South Pacific. This fictitious island was special because there was no discrimination done to half-breeds and hybrids. These are commonly known as Tonks, while promoting, and also during cat shows.

These beautiful Tonkinese animals breeds often find mentions in English novels, movies, documentaries and magazines. Known for their friendly nature, these pets are often classified as the perfect apartment cats. In general, these animals are lively with gregarious personalities and form one of the bubbliest pets. With an appealing individuality, the Tonkinese pets breed is often considered to have taken good qualities of both, Siamese and Burmese cat breeds. Even its meow is slightly different than other breeds, and its voice is often an epitome of affection. The Tonkinese pet carves and returns affection very openly.

The trim and muscular cat appears lighter than what they actually are. They have the following physical features:

- Distinctive oval-shaped paw
- An adapted wedge shaped head
- Large ears which are almost set to the outside of their heads
- Muscular appearance

There are 3 main patterns in Tonkinese cats, solid, pointed and mink. They come in 4 attractive colors and their color pattern darkens with age. The solid pattern is the most common type of Tonkinese pet pattern around.

One of the major reasons why these cats appear affectionate is their curiosity; these Tonkinese puppys are unusually curious, even to the simplest of things like a human finger. These folks are playful and mischievous and like humans or other Asian cat species around.

These cats form great pets and many owners claim, there is a sense of pleasure when these are around. Cats, in general emit happiness and Tonkinese ones are no different.

By Cody Holpp


Twitter Delicious Facebook Digg Stumbleupon Favorites More

 
Design by Free WordPress Themes | Bloggerized by Lasantha - Premium Blogger Themes | JCpenney Printable Coupons